As the chill of winter sets in, it’s a good time to start thinking about the jet ski winterize process.
It’s important that a jet ski and trailer are thoroughly prepared as the winter months hit if want to maintain a jet ski performance and longevity!!!
These steps are a super important process, especially if you live somewhere that gets below 40F/5C! You’ll be surprised by the number of people who simply forget about winterizing, so don’t let it slip you by!
Note: This post is more geared towards Sea-Doo, but it’s just about the same for Yamaha and Kawasaki jet ski.
What you need:
You’ll need these few items that will be used for multiple years.
- 1-Gal (per machine) of RV/Marine Antifreeze.
- Marine fuel and gas stabilizer.
- Fogging spray storage oil.
- WD-40 Silicone spray lubricant or similar product.
How to Winterize A Jet Ski
The process involves adding fuel stabilizer, flushing it with antifreeze, fogging the cylinders, disconnecting the battery, and greasing some components. The video below shows how the process is done if you need a visual.
On most jet skis, I’ve listed the full winterize steps you need to take:
1: Add Fuel Stabilizer
The first thing you must do for a winterize is add fuel stabilizer for the gas tank to keep the fuel in great shape as the PWC sits. The fuel stabilizer bottles generally include measurements suitable for a gas tank ranging from 2.5 to 20 gallons.
If you’re wondering if the fuel tank should be full or nearly empty, it’s your pick.
You’ll add the fuel stabilizer first, ensuring it mixes well and reaches all the fuel lines, before starting the next steps.
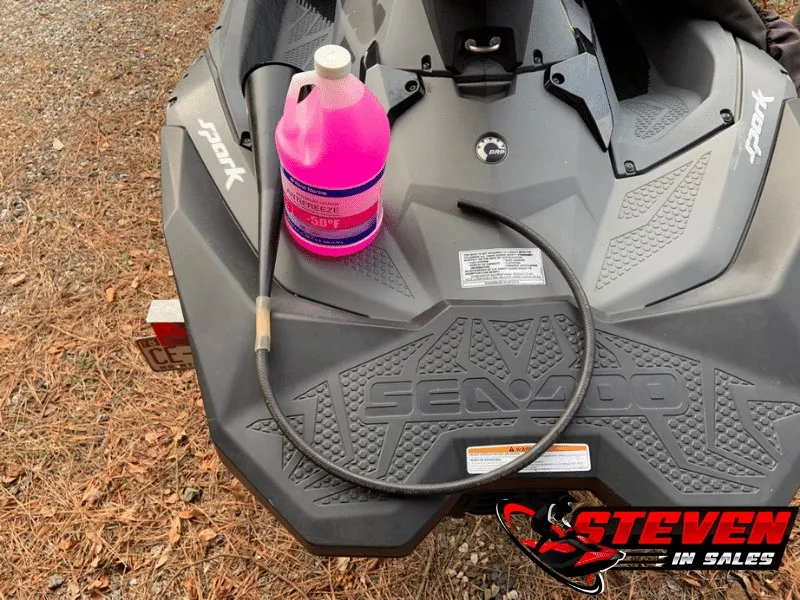
2: Flush With Antifreeze
The second step is the most important step, it involves removing the water from the engine and exhaust system!
The way you remove water from PWC engines is by using marine-grade antifreeze. Below, I’ve listed the steps for flushing the engine with the antifreeze.
- Level PWC.
- Connect the drill pump to the flush port and get the antifreeze ready.
- Turn the engine on.
- Turn on the drill pump and use the entire gallon of antifreeze.
- When you use up the whole gallon of antifreeze, turn off the drill pump, then switch off the engine.
You want antifreeze coming out the exhaust, nozzle, jet pump area, or the side discharge port. If you don’t see antifreeze come out of ONE of these ports after 20 seconds, turn the pump off and then the engine off, as something is not working right!!! Video below:
The owner’s manual suggests using compressed air for removing any water, but I prefer marine antifreeze. I find it drill pumps easier for people than an air compressor.
Add water? For the Marine and RV antifreeze should come pre-diluted and ready. Additionally, water remains in the cooling system of your PWC, hence the whole process, as it inevitably blends with water. So, adding more water into your jug is not what we want.
3: Coat & Fog Internal Engine Parts
The third step involves the engine and fogging it.
The reason you want to fog PWC engines is so you coat internal metal components to prevent rusting during periods of inactivity.
Fogging your PWC engine requires you to remove all spark plugs and spray fogging oil into each cylinder for about 3 seconds. The video below shows the fogging step:
At the start of the season, I suggest replacing spark plugs because of the effect of the fogging oil.
4: Remove Battery And Charge It
The reality is that PWC batteries go flat during the cold, so it’s good we remove them after and keep them dry and above freezing, or we run the risk of not starting next season.
Ideally, use smart chargers that manage charging automatically. Alternatively, charge batteries every other month.
Will you have a dead battery if it doesn’t get charged over winter? Maybe. The biggest complaint at the start of the seasons I get from people is that their PWC won’t start, and it’s because of the battery. Your PWC batteries are small and don’t get used enough, leading to them dying. A battery charger proves effective in maintaining battery life throughout the cold season. What I do is get my solar charger as I keep my PWCs outside and get 5 years out of my batteries.

The solar charger doesn’t need direct sunlight and will keep PWC batteries active and happy! It’s so stupid easy and effective that I don’t know why the manufacturers don’t just have the solar panels already on the covers?
5: Spray WD40 specialist Silicone Lubricant
The most overlooked step, you’ll spray WD40 silicone spray lubricant on all metal and electrical parts, including the engine and pump area.
Let the PWC sit for 15 minutes so it can air out, it’s flammable!!!
Make sure you lubricate the throttle and steering cables with marine grease.
Avoid regular WD-40, use the silicone version. The regular stuff doesn’t coat, it merely displaces water.
Here’s a useful tip for those residing near saltwater: regularly apply silicone spray on engine and jet pump areas. Repeat this process annually, allowing air drying for 15 minutes each time, and your PWC will maintain its appearance for years!
6: Put The Cover On

Do not leave the cover off your jet ski after the winterizing, this is important step. The cover keeps the snow and more importantly, rodents, spiders and other critters from getting in and eating or destroying your PWC.
Rodents like the taste of rubber and plastic, so put a cover on the cover, if you ask me.
Please consider shrink wrapping your jet ski. Shrinking wrapping keeps your jet ski in near perfect condition; snow and rain won’t affect it.
How To De-Winterize A PWC
How you de-winterize / summerize a jet ski is a lot easier than the winterize process, all you got to do is the following:
- Charge the battery.
- Replace spark plugs.
- Top up the gas tank with fresh gas.
- Ride it.
Note: If you take the PWC out for some winter ride, it will for sure need the winterize process done again.
Learn more about this process, see my post here.
Hi Steven,
Last week I snagged a 2020 GTI SE with sound system for $10,299 including trailer. 66 hours. With the prices and availability of things right now I didn’t feel too bad about that.
When I go to winterize that, is it better to winterize with a near full tank of gas or do I want to run the gas down as low as possible before tucking it away?
Fuel tank level is more of a personal preference. Many people like to fill it all the way up and then add the fuel stabilizer. I personally keep the gas tank under two bars and then add the fuel stabilizer. Then when the season starts I fill it up with premium and it hasn’t failed me yet.
Thanks… I know Sea-Doo recommends just 87 octane gas. You feel better with premium? How about ethanol free?
If it’s non-supercharged then regular is fine, but if it’s supercharged I would run premium. At the start of the season, I always put in premium to freshen up the gas that’s been sitting during the winter. If you can avoid ethanol do that but it’s no big deal if you can’t.
Steven,
Can you help me? I live in Lake Tahoe and Cave rock boat ramp is open all winter long. My plan is to wear a long wetsuit and ride my Jetski (2021 Sea-Doo GTX230) probably into November. Do I need to winterize it if I am riding it 1-2 times a week in November? After November I will definitely winterize it but just wanted to see if it is safe to ride it regularly into November?
Thank you,
Daniel
If it gets below freezing for more than 24 hours I would at least do the RV & Marine antifreeze flush.